
3D Designs for 3D Printer: Supports, Overhangs, Tolerances

Most print failures don’t come from “bad printers”, they come from geometry that fights the laws of gravity (overhangs), physics (unsupported spans), and manufacturing reality (tolerances). If you want your 3D designs for 3D printer success to feel predictable (whether you print at home or use a service), three concepts matter more than almost anything else: supports, overhangs, and tolerances.
This guide breaks down what those terms mean in practice, how to design around them, and what to communicate when you’re sending a file to a printing service.
Supports and overhangs: what the printer can (and can’t) do
Overhangs in plain English
An overhang is any surface that prints “out into the air” instead of stacking mostly on top of the layer below. The more horizontal that surface gets, the more the printer has to deposit material without enough material underneath to hold it.
For many FDM prints, a common rule of thumb is that around 45° from vertical is often printable without support, depending on layer height, cooling, filament, and part size. Many resin prints can reproduce steep angles beautifully, but still struggle with large flat, downward facing areas because of suction forces and peel mechanics during printing.
If you want a quick visual benchmark for FDM overhang behavior, Prusa’s guidance is a solid starting point: Prusa Research support and overhang concepts.
Supports are not “free”
Supports make impossible geometry possible, but they come with tradeoffs:
- Surface quality: The supported face typically looks worse than an unsupported face.
- Dimensional accuracy: Support contact points can slightly distort edges or small features.
- Post-processing time and risk: Removing supports can snap thin parts or mar visible surfaces.
- Cost (for services): More material, longer print time, more labor.
Design goal: use supports only where they add clear value.
Designing overhangs that print cleanly (often without supports)
Use self-supporting shapes
If a feature must “stick out,” choose geometry that supports itself as it grows layer by layer.
- Chamfers often print more reliably than square edges.
- Teardrop holes (instead of perfect circles) keep the top of the hole self-supporting in FDM.
- Gothic arches and curved transitions can reduce abrupt unsupported spans.
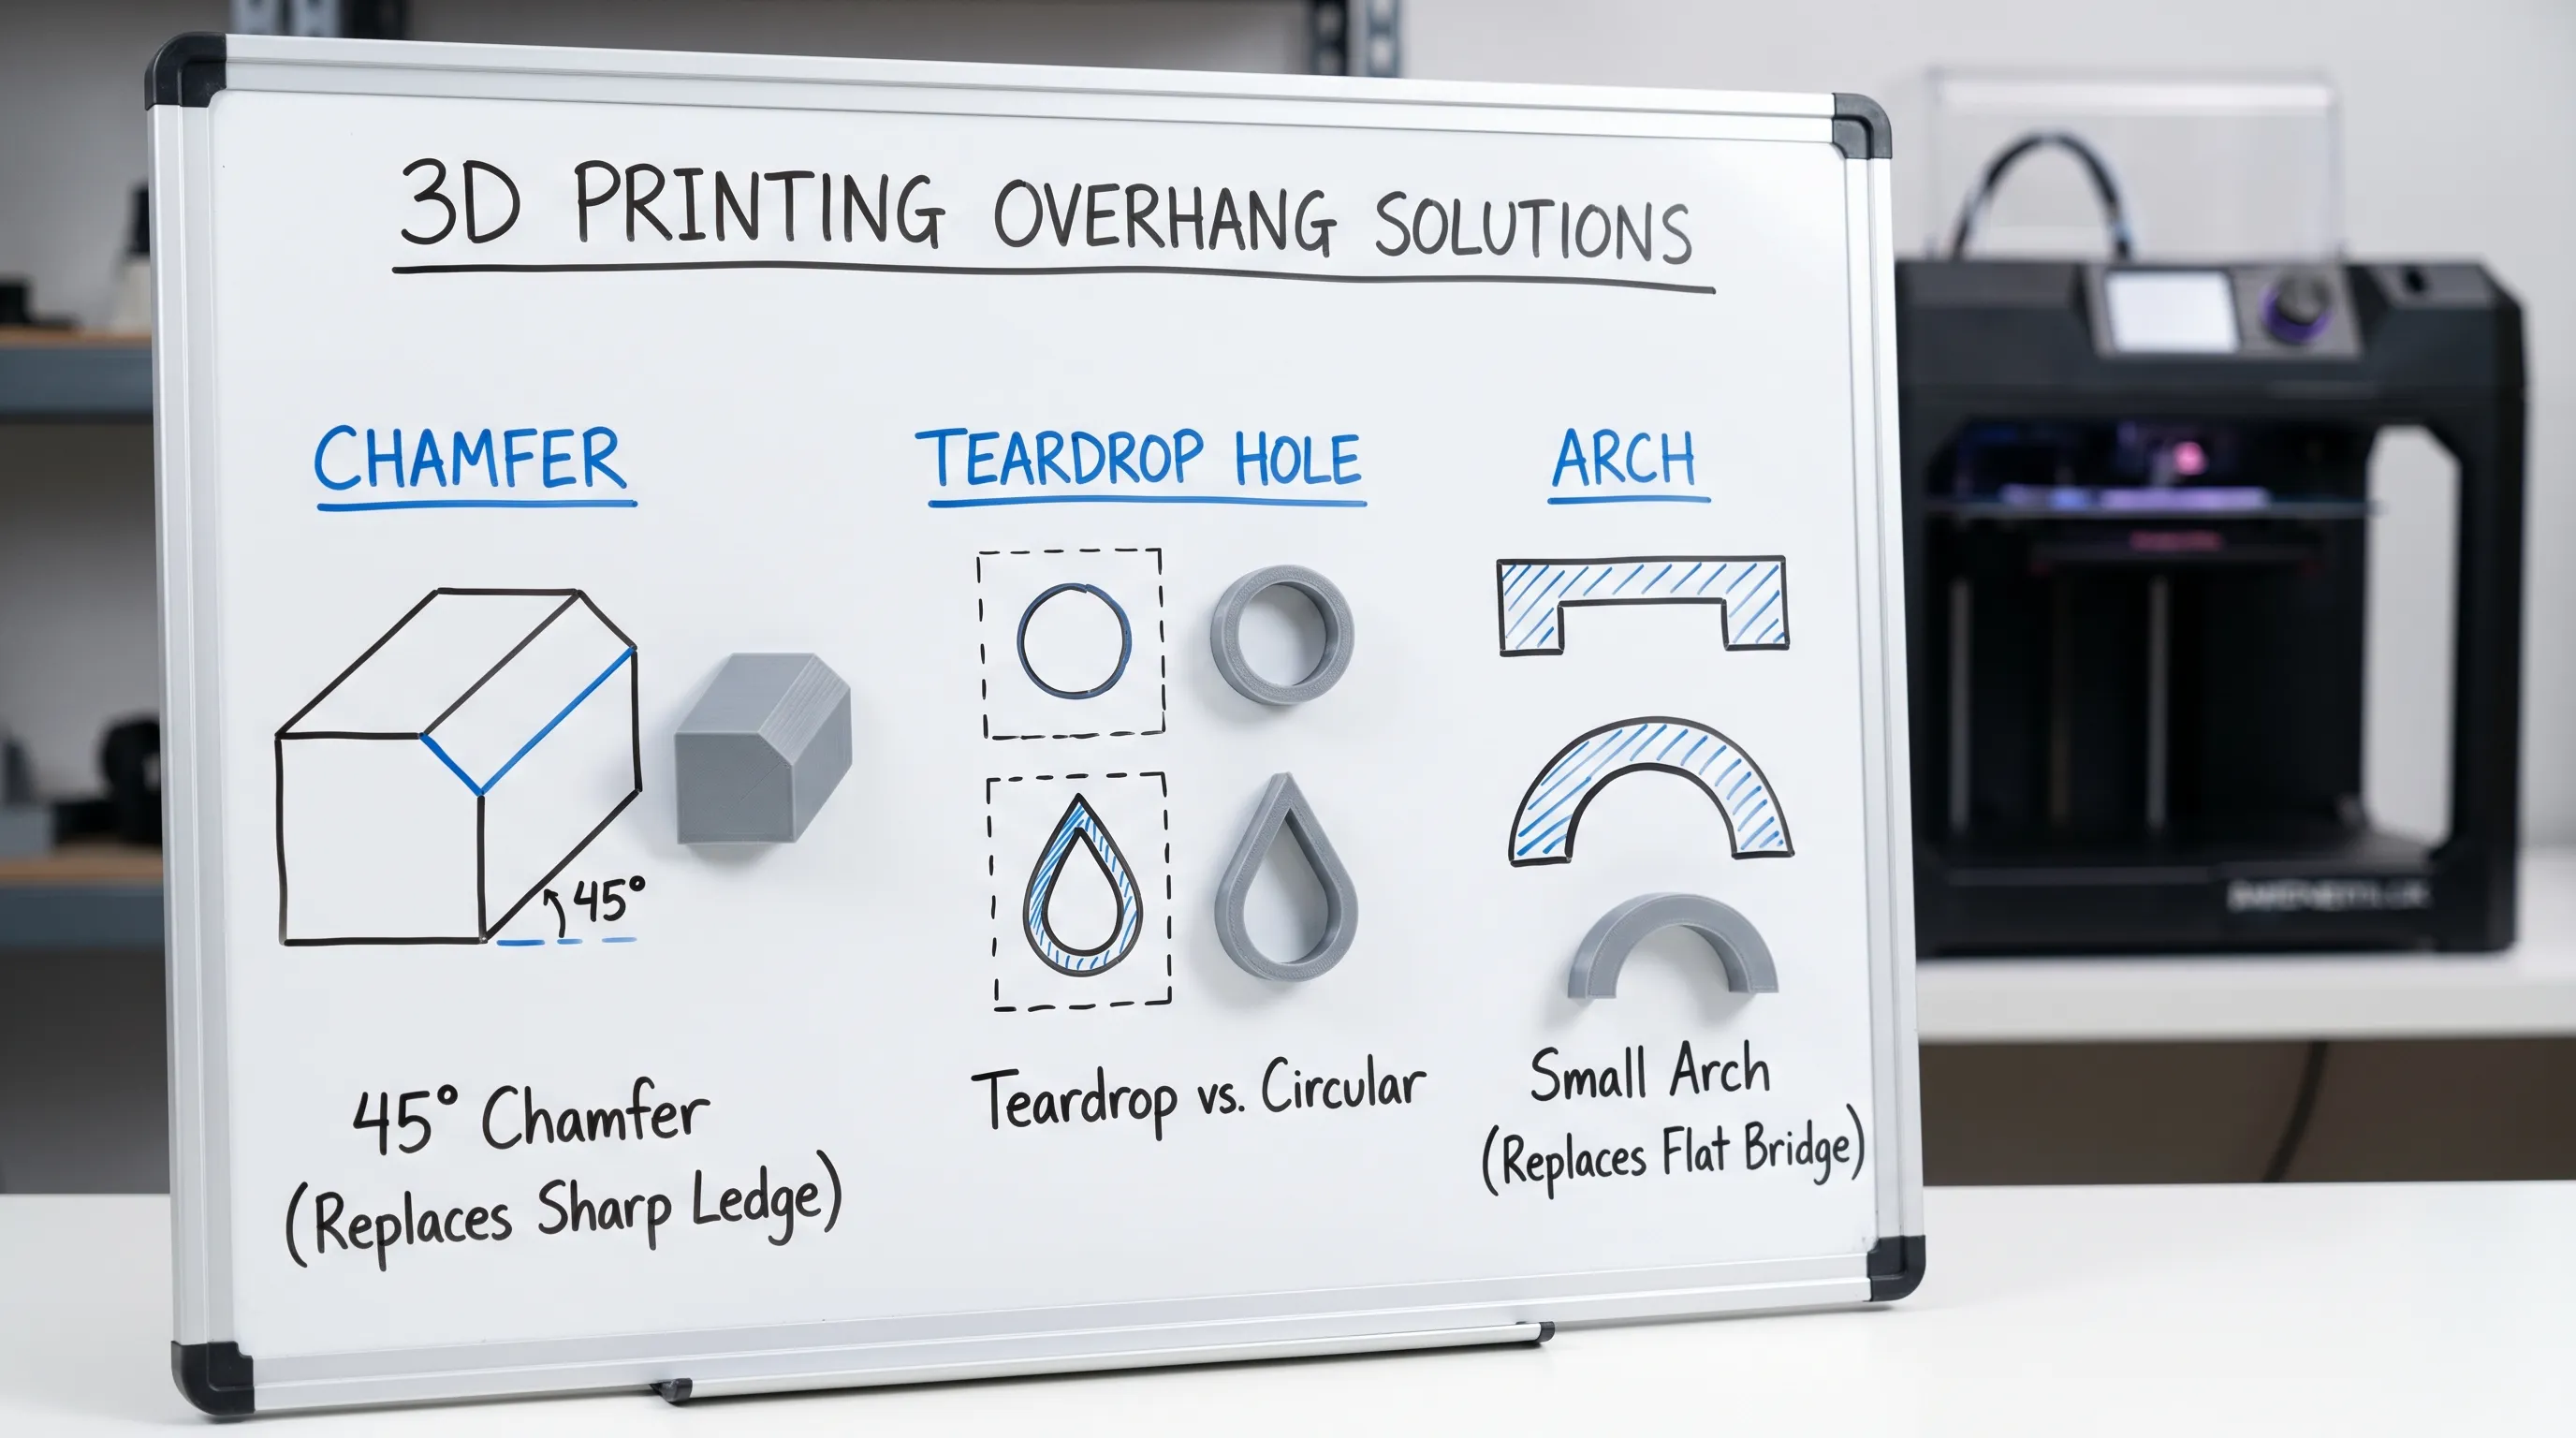
Turn “ceilings” into bridges you can control
A bridge is a horizontal span printed between two supported points. Short bridges can print surprisingly well in FDM with good cooling and tuned speed.
Design tips that usually help bridging:
- Keep spans short when possible.
- Add intermediate ribs or beams so you’re bridging in smaller segments.
- Avoid making the bridged surface a cosmetic “front face.” Put it on the inside or underside.
Split the part where gravity would punish it
Instead of supporting a complex shape, split it into two pieces that each prints in a stable orientation, then assemble.
Good split strategies:
- Hide the seam on a natural edge or panel line.
- Add alignment keys (simple pegs and sockets) that also enforce correct assembly.
- Plan for adhesive, screws, or heat-set inserts depending on your use case.
If you’re ordering a print and you’re unsure whether splitting is worth it, it’s often a fast conversation with a service provider because it impacts strength, finish, and cost.
Support strategy: making supports easier to remove and less visible
Choose “sacrificial” faces
If you know supports are inevitable, decide where you can tolerate:
- Slight scarring
- Matte texture differences
- Cleanup marks
Common approach: orient the part so supports land on the least visible face, then keep your “hero surface” support-free.
Add support-friendly features on purpose
In some designs, tiny tweaks reduce damage and cleanup time:
- Add a small flat pad where a support must touch, instead of contacting a thin edge.
- Thicken fragile tips slightly, then sand back after.
- Avoid knife edges on supported faces, they’re easy to chip.
Resin-specific note: supports are also about forces
Resin printing supports do more than hold up overhangs, they help manage peel forces. Large flat sections parallel to the build plate can create suction, which increases failure risk.
Formlabs publishes helpful, practical design guidance for resin orientation and support decisions: Formlabs support and orientation basics.
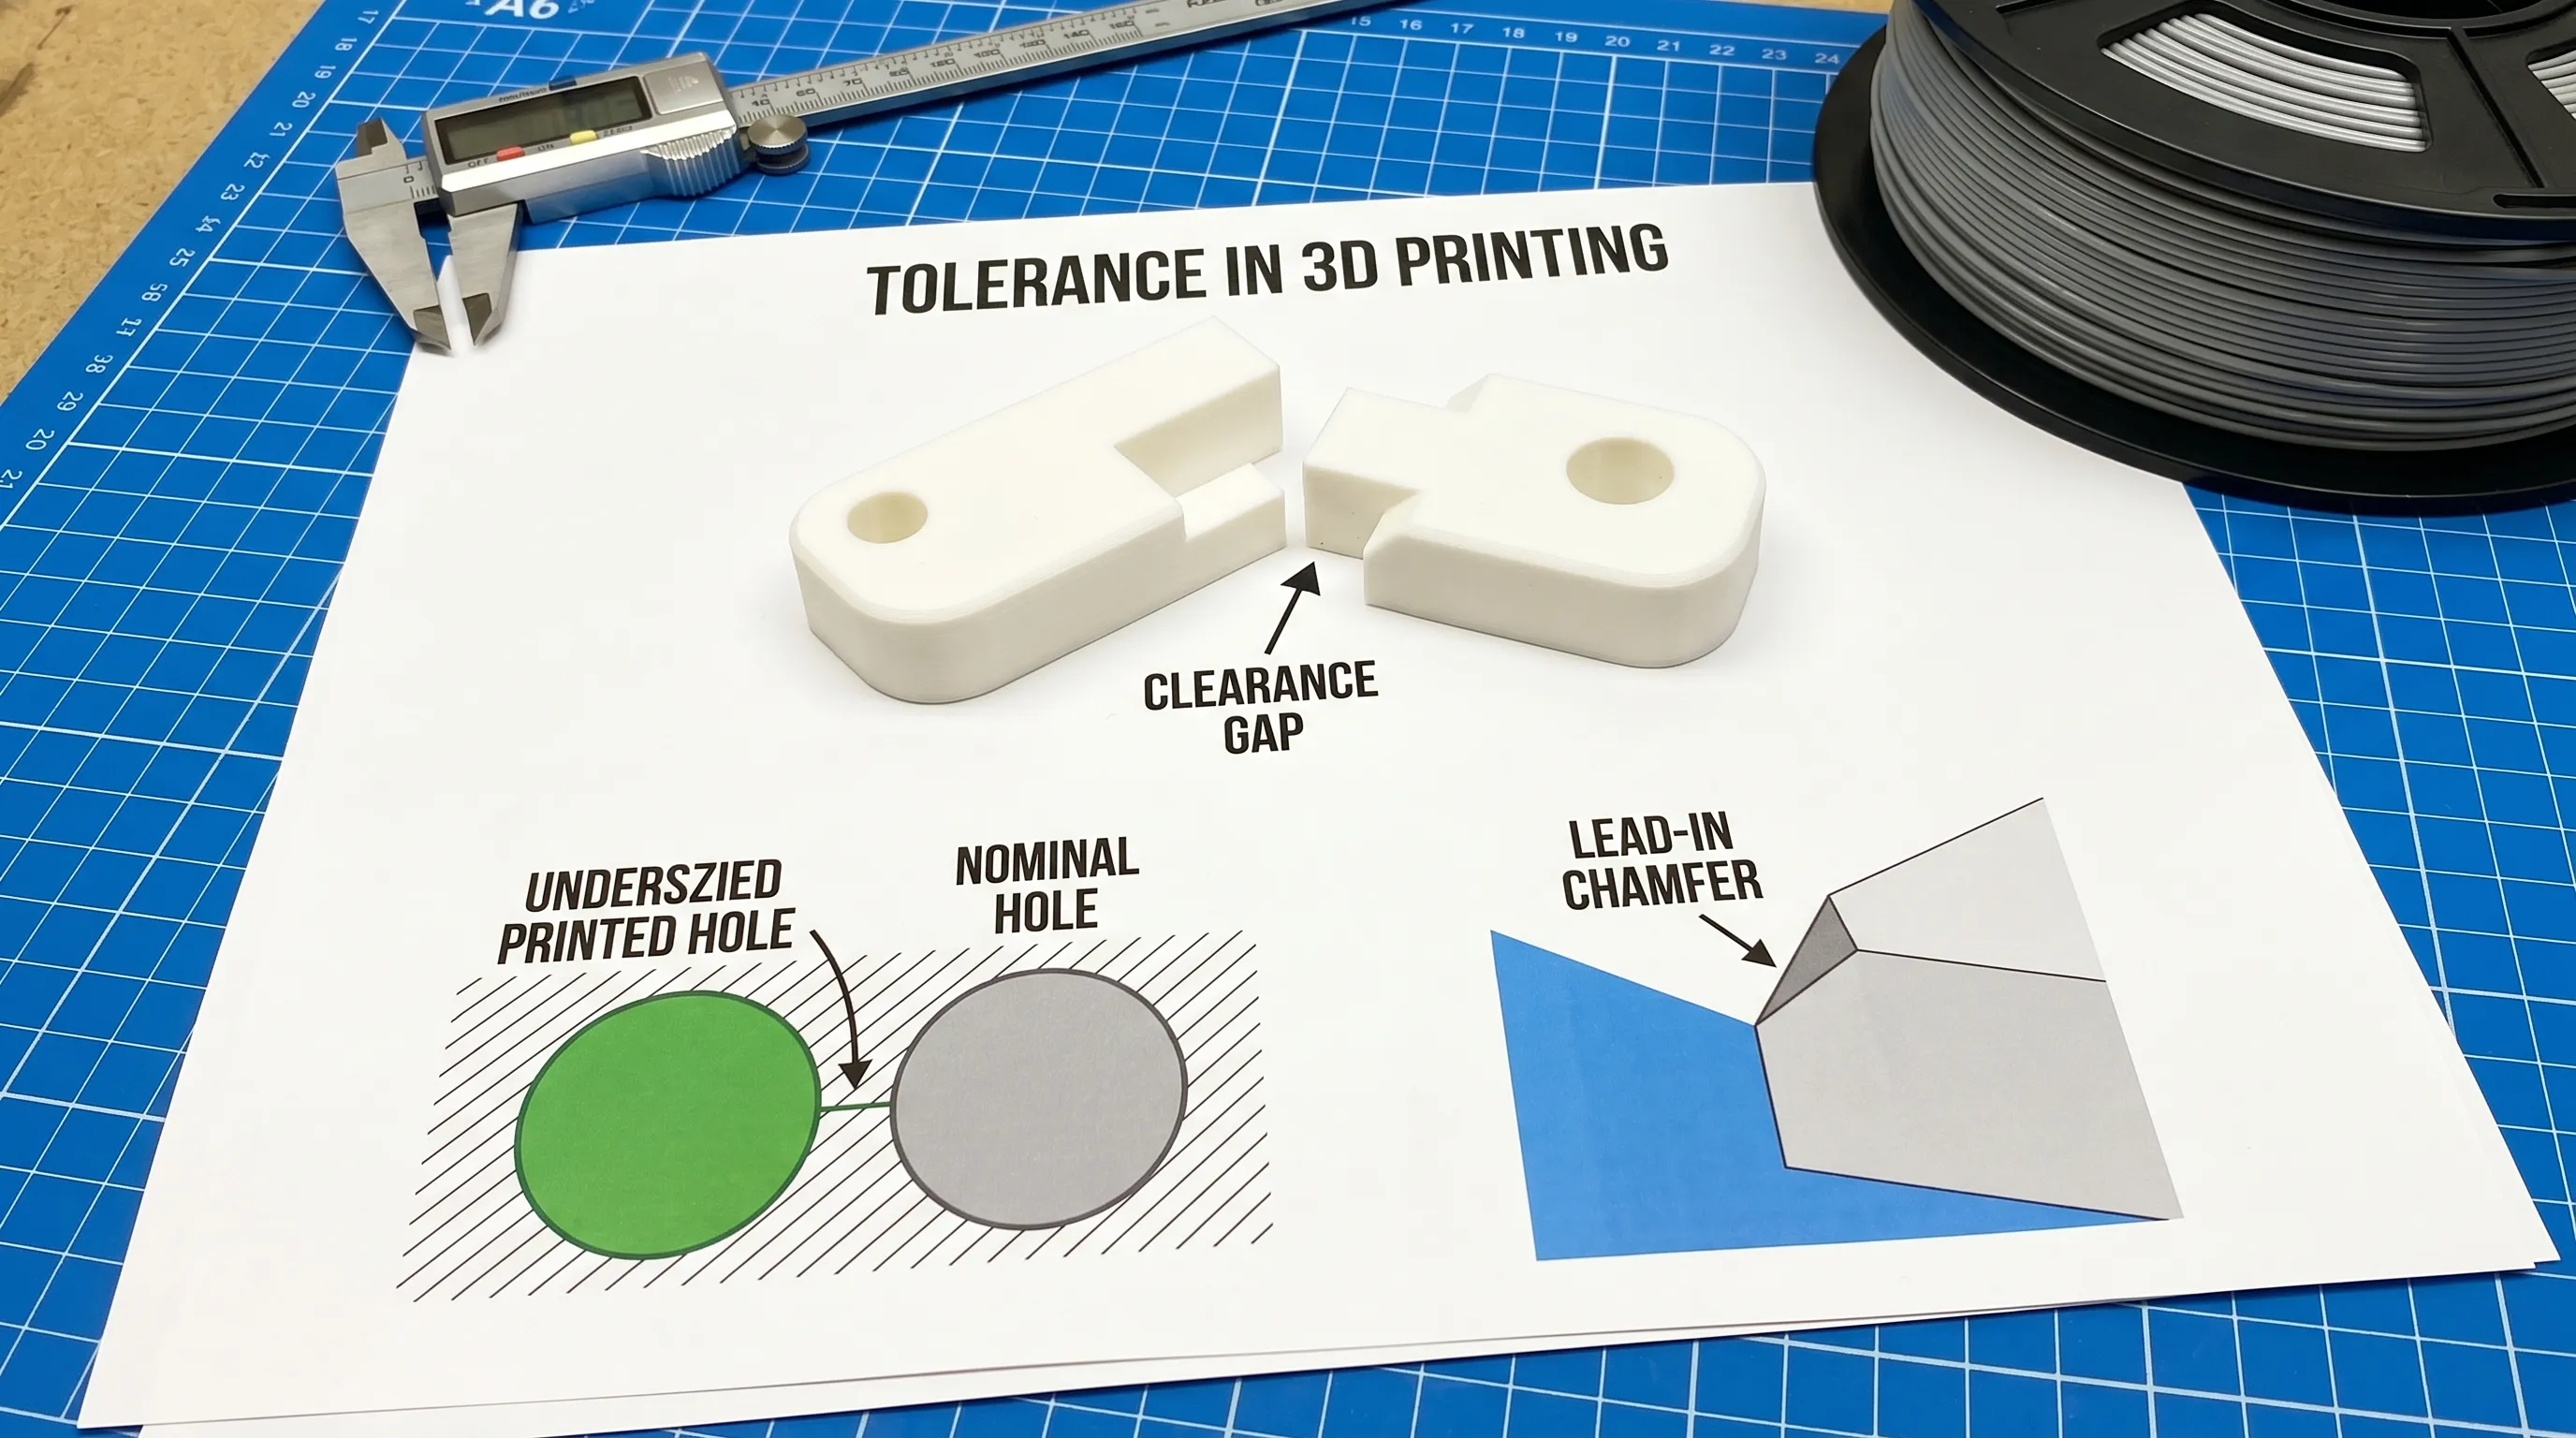
Tolerances: the difference between “fits in CAD” and “fits in real life”
What tolerance means for 3D printing
Tolerance is the expected deviation between your CAD dimensions and the finished part.
Even with excellent machines, parts vary because of:
- Material shrinkage and cooling
- Slicer settings (line width, layer height, exposure)
- Support contact and cleanup
- Part orientation (XY vs Z can behave differently)
So when you design assemblies, you need intentional clearance.
Start with clearance, then dial in
Because printers, materials, and processes vary, it’s best to treat the numbers below as starting points, then validate with a small test coupon (for example, a clearance gauge with multiple gaps).
| Feature type | FDM typical starting clearance | Resin (SLA/MSLA) typical starting clearance | SLS/MJF typical starting clearance |
|---|---|---|---|
| Sliding fit (parts should move) | 0.3 to 0.6 mm | 0.15 to 0.35 mm | 0.3 to 0.6 mm |
| Snug fit (press but not forced) | 0.2 to 0.4 mm | 0.1 to 0.25 mm | 0.2 to 0.4 mm |
| Cosmetic gap (panel line look) | 0.2 to 0.5 mm | 0.1 to 0.3 mm | 0.2 to 0.5 mm |
Notes:
- These are gap/clearance values, not overall part accuracy guarantees.
- Post-processing (sanding, vapor smoothing, painting) can change fits significantly.
Holes and pins: don’t assume a perfect circle
A classic 3D printing surprise is that holes often print undersized and pins can print slightly oversized, especially in FDM. Reasons include extrusion width, path planning, and how layers approximate curves.
Practical design habits:
- If a hole must be precise, consider making it slightly larger in CAD and reaming/drilling to final size.
- Add a lead-in chamfer to help fasteners start straight.
- For aligned assemblies, consider using metal hardware (dowel pins, screws) for the final precision instead of relying only on printed geometry.
Threads: printed threads vs inserts
For functional parts, you generally have three choices:
- Printed threads: fine for low load, larger thread sizes, or occasional use.
- Threaded inserts (heat-set for many FDM plastics): durable, great for repeated assembly.
- Captive nuts: simple and strong, especially for larger parts.
If you’re designing an enclosure or jig that will be opened repeatedly, inserts or captive nuts often outperform printed threads.
Quick design checks before you export your file
Use this as a preflight focused specifically on supports, overhangs, and tolerances:
- Identify any broad “downward facing” surfaces, decide if you will support them or redesign them.
- Replace sharp 90° overhang ledges with chamfers or arches where possible.
- If two parts must fit, add explicit clearance and include a note about intended fit (sliding vs snug).
- For holes that must be accurate, plan a post-process step (drill/ream) or oversize the CAD hole.
- Decide which surfaces are cosmetic, then orient or split the model to protect them.
If you want a broader model-readiness checklist (mesh validity, wall thickness, file formats), Firecloud Printz also has a helpful companion guide: How To Choose a 3D Model for 3D Printer Success.
If you’re printing to sell: supports and tolerances affect fulfillment too
When you move from “one-off print” to small-batch products, the geometry choices above also affect:
- Consistency across units (tolerances that barely work once often fail in batches)
- Packing time (fragile, heavily supported parts need more careful handling)
- Shipping damage rates
If you’re building inventory or shipping multiple items at once, it can help to think about sturdier outbound logistics, including sourcing shipping platforms and packaging workflows. Some sellers even look into options like bulk pallets for sale when scaling storage and freight for larger shipments.
Frequently Asked Questions
What overhang angle can I print without supports? Many FDM prints handle about 45° from vertical without supports, but it depends on cooling, material, and layer height. Treat it as a starting point and test your specific setup.
Do supports reduce part accuracy? They can. Supports can scar surfaces, slightly distort edges, and require cleanup that changes dimensions, especially around contact points.
What clearance should I use for parts that must fit together? It depends on process and desired fit. As a starting point, many designers try 0.3 to 0.6 mm for FDM sliding fits and 0.15 to 0.35 mm for resin sliding fits, then adjust after a test print.
Why do my holes come out too small? Holes often print undersized due to toolpath approximation of curves and how extruded lines lay down. Oversizing holes slightly in CAD or drilling to final size is common.
Is it better to split a model or use supports? Split when you need cleaner cosmetic faces, better strength orientation, or easier post-processing. Use supports when the part must be monolithic or splitting would create weak seams.
Bring your design to life with fewer surprises
If you have a model that’s close but you’re unsure about supports, overhang risk, or assembly tolerances, Firecloud Printz can help you turn the file into a printable, good-looking part. You can request a quick estimate for custom 3D printing or browse the shop for ready-made, designer-authorized prints at Firecloud Printz.