
3D Printer Prints: How to Improve Strength and Finish
If your 3D printer prints look great on the bed but crack in use, or they feel strong but look “home-made” up close, you are running into the two big realities of additive manufacturing: parts are directional (anisotropic), and surface quality is largely a process choice.
This guide focuses specifically on improving strength and finish for common 3D printer prints, across FDM (filament) and resin printing. It is written for makers who already know the basics and want parts that survive real use and look professional.
Strength vs finish: what actually changes when you tweak settings
Strength and finish are linked, but not identical:
- Strength depends on material properties, part geometry, layer bonding, and how the print is loaded in the real world.
- Finish depends on layer height, cooling, support strategy, seam control, resin exposure, and post-processing.
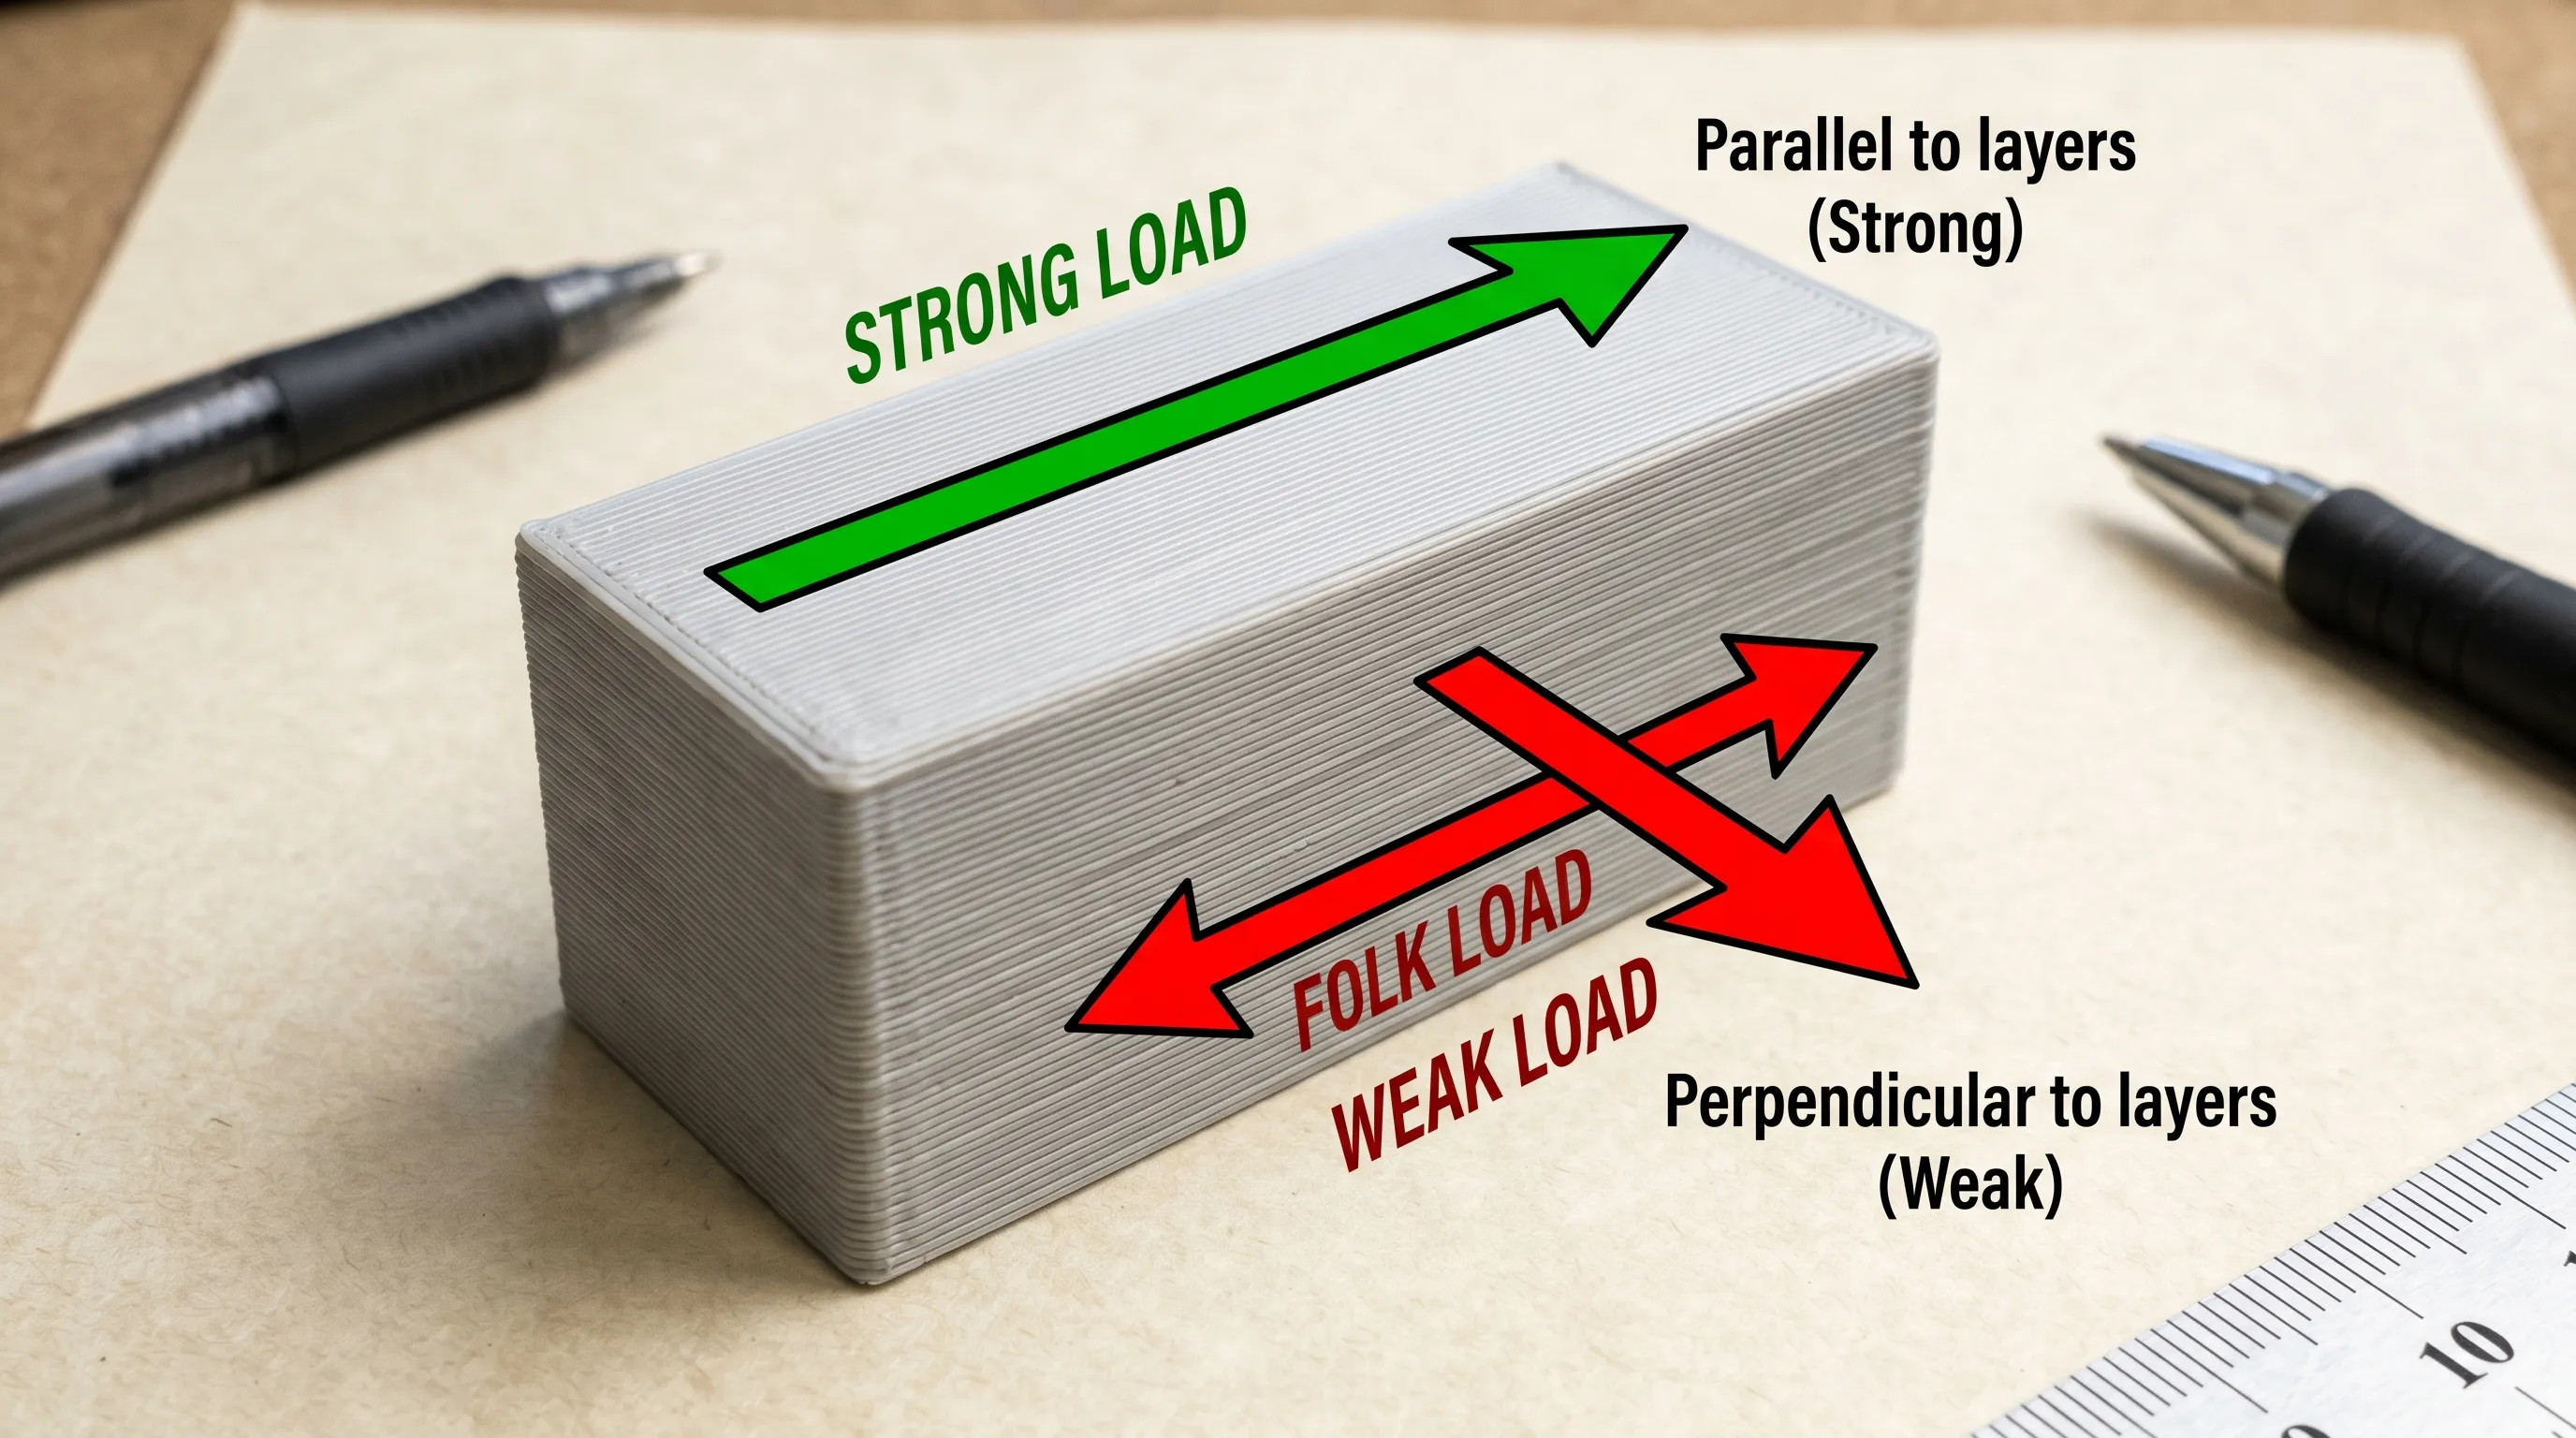
The most important concept for FDM is that layer adhesion is usually weaker than strength within a layer. A part that is “strong” in one direction can split cleanly along layer lines in another.
For resin, parts are typically more isotropic than FDM in practice, but they can be brittle if the resin choice and post-cure are not matched to the job.
Design changes that make 3D printer prints stronger (often without adding much time)
Before you touch slicer settings, look at the geometry. Many “weak print” problems are really “stress concentration” problems.
Use thickness strategically: walls beat infill for real strength
For most functional prints, more perimeters (walls) outperform higher infill because:
- Perimeters form a continuous shell that carries load.
- Infill often fails first or delaminates from the walls under bending.
A good mental model: if you can afford extra plastic anywhere, put it on the outside first.
Add fillets, ribs, and gussets to remove stress risers
Sharp inside corners are crack starters. If a part fails at a corner or a hole, add:
- Fillets at internal corners
- Ribs along long, flat spans
- Gussets where a vertical wall meets a base
These changes often add more strength than doubling infill.
Split parts where it helps orientation
If the part’s best cosmetic face and best strength orientation conflict, consider splitting the model so each section can be printed in its ideal orientation, then assemble with:
- Screws
- Pins/dowels
- Heat-set inserts (excellent for repeated assembly)
- Adhesives (material-dependent)
If you want a deeper design-for-printing refresher on supports and orientation tradeoffs, Firecloud Printz also breaks it down here: supports, overhangs, and tolerances.
The strongest orientation is the one that fights layer separation
Orientation is the #1 lever for strength on FDM prints.
A simple rule:
- If the part is pulled apart, align layers so the force is not trying to “peel” them apart.
Examples:
- Hooks and brackets: Print so the “hook bend” is reinforced by continuous perimeters, not stacked layers that can delaminate.
- Snap fits: Often work better when the flexing happens within layers, not across layers.
- Bolted joints: Try to orient so the bolt load compresses layers rather than pulling them apart.
Slicer settings that increase strength (FDM)
Once the design and orientation are sane, slicer tuning becomes predictable. The goal is to improve inter-layer bonding and remove features that create weak planes.
Strength-first setting changes (practical starting points)
| Goal | What to change | Why it helps | Typical starting point |
|---|---|---|---|
| Stronger shell | Perimeters (wall count) | Shell carries bending loads | 3 to 5 walls for functional parts |
| Stronger top/bottom | Top/bottom layers | Reduces “pillowing” and thin skins | 5 to 8 layers (depends on layer height) |
| Better layer bonding | Nozzle temp | Hotter extrusion improves fusion (up to a point) | +5 to +15°C from your “pretty” profile |
| Fewer weak planes | Layer height | Taller layers can reduce interfaces, but can hurt detail | 0.20 to 0.28 mm for strength prints |
| Stronger perimeters | Line width | Wider lines increase bead contact area | 110% to 120% of nozzle diameter |
| More consistent bonding | Print speed | Slower gives heat time to transfer | Reduce outer wall speed first |
| Less warping stress | Enclosure, bed temp, drafts | Warping creates internal stress and cracks | Block drafts, use enclosure for ABS/ASA |
Two notes that save a lot of time:
- If you increase temperature, watch bridging and overhangs. You may need slightly more cooling for those regions.
- If your printer under-extrudes due to partial clogs, worn nozzle, or wet filament, no “strength profile” will fix it.
Infill: choose patterns for load paths, not percentages
Infill matters most when the part is thick and load-bearing, but pattern choice is often more important than jumping from 20% to 40%.
General guidance:
- Gyroid is a strong all-around choice for multi-directional loads.
- Grid is stiff but can concentrate stress where lines intersect.
- Cubic patterns often give good strength-to-weight.
If you need a quick upgrade without overthinking it, keep infill moderate and put your time into walls.
Material choices that improve strength (and what “strong” really means)
Material strength is not one number. You usually care about one of these:
- Stiffness: resists bending (PLA is often stiff)
- Toughness: resists cracking (PETG, some nylons)
- Heat resistance: survives hot environments (ABS/ASA, some specialty filaments)
- Wear resistance: survives friction (nylon variants)
Here is a practical material cheat sheet for FDM prints:
| Material | Best for | Watch-outs |
|---|---|---|
| PLA | Stiff prototypes, display parts, low-stress jigs | Can creep under heat, can be brittle in thin features |
| PETG | General functional parts, light outdoor use | Can be stringy, can flex more than PLA |
| ABS/ASA | Heat resistance, enclosures, outdoor parts (ASA) | Warping, needs enclosure and good ventilation |
| TPU | Impact resistance, grips, vibration isolation | Print tuning required, dimensional accuracy can be harder |
| Nylon (PA) | Tough functional parts, wear surfaces | Often needs dry storage and higher temps |
For resin printing, consider “engineering” or “tough” resins for functional parts. Standard resins can look amazing, but they are often the wrong tool for clips, brackets, or anything that takes impact.
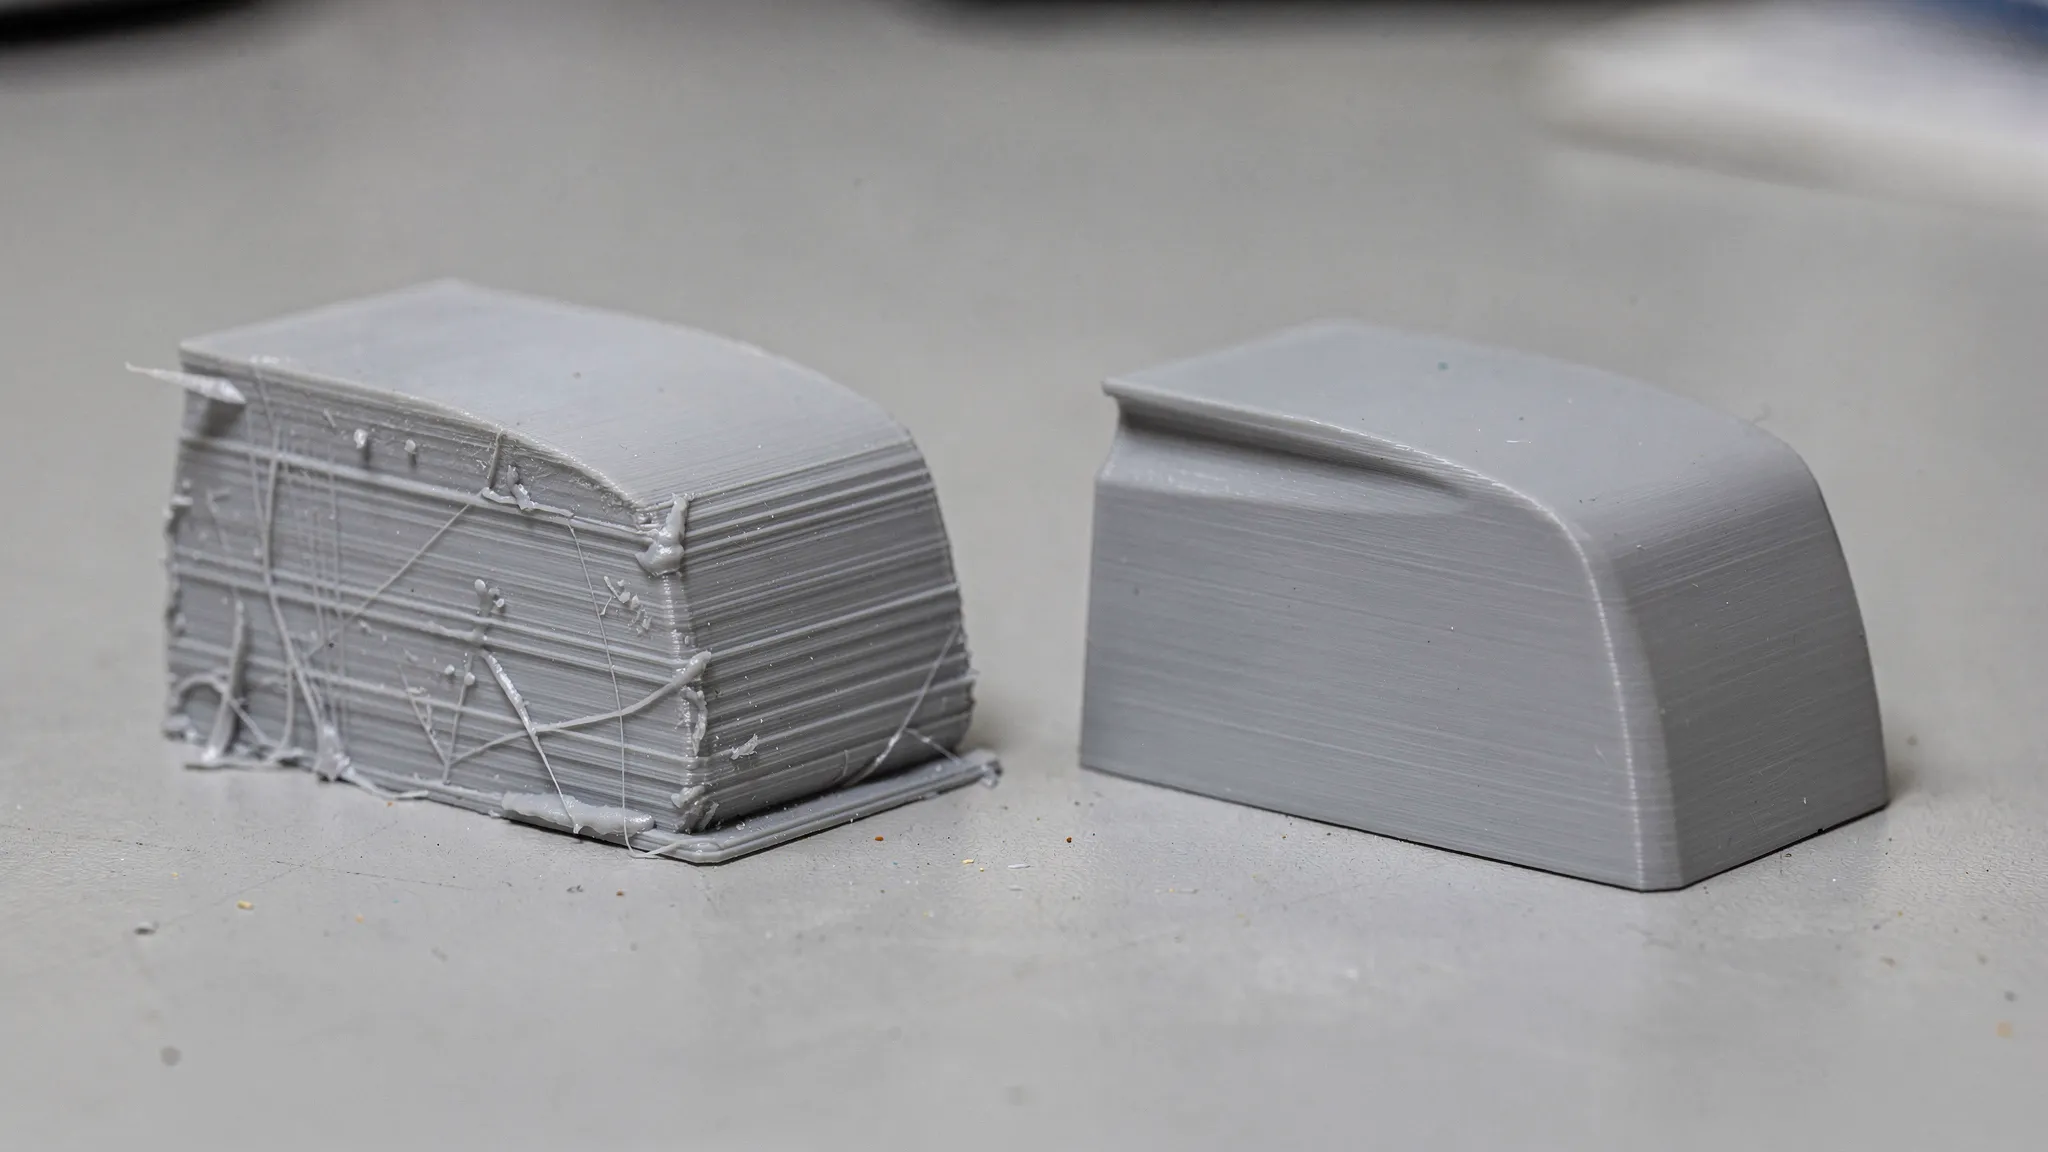
Improve finish during printing (before sanding ever starts)
A smoother finish is easiest when you prevent defects upstream.
Control the seam and hide it on purpose
On FDM parts, the Z-seam is a big reason prints look “printed.” Most slicers let you:
- Align seam to a corner
- Place seam on the back
- Randomize seam (sometimes hides it, sometimes makes it worse)
If your part has one “hero face,” explicitly place the seam somewhere else.
Use variable layer height for curved surfaces
Instead of printing everything at 0.12 mm, many slicers can apply thinner layers on curves and thicker layers on straight sections.
You get:
- Better curve smoothness
- Less print time increase than “thin layers everywhere”
Dial supports for the surface you care about
Supports are a finish decision, not just a “will it print” decision.
- Avoid putting supports on your most visible face.
- Use orientations that move supports to hidden faces.
- If you must support a cosmetic face, consider splitting the model so the show surface prints support-free.
If you are evaluating models for clean, support-minimized prints, this Firecloud Printz guide helps: what makes a model easy to print.
Resin finish: exposure calibration beats polishing later
For resin, surface finish is often dominated by:
- Correct exposure (overexposure can soften detail)
- Lift speeds and peel forces (too aggressive can scar surfaces)
- Orientation (angled printing reduces “stair steps”)
If you see glossy, slightly swollen details, calibrate exposure before you assume it is a “bad resin.”
Post-processing for a professional finish (FDM and resin)
Post-processing is where prints become “products.” The trick is picking a method that matches the material and the final look.
Finish methods and when to use them
| Method | Best for | Notes |
|---|---|---|
| Sanding (dry/wet) | Removing layer lines, smoothing flats | Start coarse, end fine, wet sanding helps reduce clogging |
| Filler primer + sanding | “Paint-ready” surfaces | Great for cosplay props and display prints |
| Putty/spot filler | Small seams, support marks | Use sparingly, then sand |
| Painting | Visual realism, branding | Use primers compatible with plastic/resin |
| Heat-set inserts | Durable threaded connections | Improves both function and perceived quality |
| Vapor smoothing (ABS) | Glossy, near-injection look | Requires care, ventilation, and material compatibility |
A practical “good enough” finish workflow (fast and repeatable)
If you want a reliable routine for display-quality parts:
- Remove supports carefully, trim blobs and scars.
- Sand 120 to 220 grit to knock down high spots.
- Apply filler primer, let it cure fully.
- Sand 320 to 600 grit.
- Paint and clear coat (optional), let it harden.
For resin prints, wash and cure properly first. Over-curing can make some resins more brittle, so follow the resin manufacturer’s guidance.
Make prints stronger after printing (without reprinting)
Sometimes you already have the part and need it to survive.
Use heat-set inserts instead of self-tapping screws
If a part will be assembled more than once, self-tapping screws can chew up plastic. Heat-set inserts distribute load and make the part feel “manufactured.”
Consider annealing carefully (especially PLA)
Annealing can improve heat resistance and sometimes strength, but it can also:
- Warp parts
n- Change dimensions
n- Reduce cosmetic quality
If tolerances matter, test annealing on a small calibration part first.
Reinforce with hardware
For structural prints, adding simple hardware can outperform any slicer tweak:
- Bolts with washers
- Embedded nuts
- Metal rods for bending loads
You design a plastic shape that positions the hardware, and the hardware carries the load.
Consistency tips for batches and “production-like” 3D printer prints
If you print the same part repeatedly, the challenge shifts from “can I print it” to “can I print it the same way every time.”
Focus on process control:
- Dry filament and store it properly (especially PETG and nylon).
- Replace nozzles when surface quality degrades or dimensions drift.
- Log your successful settings per material and printer.
- Control environment for warp-prone materials (enclosure, stable room temp).
If you sell prints or run a small maker business, operational consistency also includes clean quoting and billing. If you need a lightweight way to handle invoicing and reporting, an online tool like Kontozz for invoicing can help keep the admin work from taking over your print time.
When it makes sense to use a 3D printing service for strength and finish
DIY printing is great for iteration, but a service can be the right move when:
- The part must be strong in a specific direction and you want help validating orientation and material.
- The surface needs to be presentation-ready without trial-and-error.
- You need consistent output across multiple parts.
Firecloud Printz focuses on high-detail 3D printing for both custom files and designer-authorized products, with fast order estimates and multiple material options.
Frequently Asked Questions
What makes 3D printer prints stronger, more infill or more walls? More walls (perimeters) usually increases real-world strength more than raising infill, especially for bending and impact. Use infill to support thick sections, not as the primary strength lever.
What is the strongest orientation for an FDM print? The strongest orientation is the one where expected forces act mostly within layers, not trying to separate layers. Avoid orientations where the load “peels” layers apart.
Is PLA or PETG stronger for functional parts? It depends on the failure mode. PLA is often stiffer, PETG is often tougher and less brittle. For parts that may flex or take impact, PETG is commonly the safer choice.
How do I reduce layer lines without doubling print time? Use variable (adaptive) layer height on curved areas, place the seam intentionally, and tune extrusion and cooling. Then use filler primer for a fast jump in surface quality.
How can I make resin prints less brittle? Use a tough or engineering resin for functional parts, avoid excessive post-cure, and orient to reduce stress during peeling. Standard resins are often best reserved for visual models.
Can I get an injection-mold-like finish on FDM parts? You can get close with sanding plus filler primer and paint, or vapor smoothing on ABS (with proper safety precautions). The best approach depends on the geometry and material.
Bring your strongest, cleanest prints to life with Firecloud Printz
If you want 3D printer prints that feel solid in the hand and look finished on the shelf, Firecloud Printz can help you choose the right material, orientation, and post-processing path for your project. Submit a custom request through the Firecloud Printz site for a fast estimate, or browse the shop for designer-authorized prints ready to order.