
3D Printing How To: Get Clean Prints on Your First Try
Clean 3D prints are not “luck” and they are not reserved for experts. Most first-time print problems come from a small set of repeatable issues: material condition, first-layer setup, slicer choices, and support strategy. Fix those before you hit Print, and your odds of getting a crisp, professional-looking part on the first attempt jump dramatically.
This 3D printing how to guide is built for beginners and busy makers who want results fast. It focuses on what actually changes surface finish and accuracy, without turning into a 3-month calibration project.
What “clean prints” actually means (and how to judge it)
“Clean” can mean different things depending on whether you are printing a display piece, a prototype, or an end-use part. Use the checklist below to define success before you start, so you can make the right tradeoffs.
| Clean-print goal | What it looks like | What usually controls it most |
|---|---|---|
| Smooth surfaces | Minimal visible lines, no fuzz or blobs | Layer height, temperature, cooling, print speed, support placement |
| Sharp edges and details | Corners stay crisp, text is readable | Pressure/flow tuning, speed, acceleration, cooling, resin exposure |
| Dimensional accuracy | Parts fit, holes and tabs line up | Calibration, shrink/elephant foot control, orientation, tolerances |
| Consistent finish | One side does not look “worse” than another | Orientation, seam placement, support contact strategy |
If you are still choosing a model, it helps to do a quick “printability scan” first. Firecloud Printz has a dedicated guide on how to choose a 3D model for 3D printer success that pairs well with the steps below.
The 10-minute preflight that prevents most ugly prints
Do this every time you switch materials, change nozzles, or start a new project. It feels basic, but it prevents the majority of first-try failures.
Confirm your material is print-ready
For FDM (filament), moisture is a top cause of stringing, rough surfaces, and random zits. Many filaments absorb water from air, even when they look “fine.” If your filament pops, sizzles, or looks fuzzy coming out of the nozzle, dry it before attempting a “clean” print.
For resin printers, resin condition and temperature matter more than most people think. Cold resin can behave very differently than resin at room temperature, and contamination in the vat can cause failures that look like “bad settings.” Formlabs notes resin printing performance can be affected by temperature and resin handling (including mixing and filtering) in their support and troubleshooting resources.
Clean the surfaces that matter
A “clean print” starts with literally clean hardware.
- FDM: Clean the build plate (soap and water works well for many removable plates, and is often more reliable than alcohol alone), remove filament debris from the nozzle area, and make sure the plate is not greasy from fingerprints.
- Resin: Inspect the vat for cured bits, check the film condition, and confirm the build plate is free of cured resin and fully tightened.
Run a quick mechanical sanity check
You are looking for obvious issues that create visible defects.
- Belts feel reasonably tight (not floppy)
- No wobble in the build plate or toolhead
- Z axis moves smoothly
- No loose screws on the hotend or extruder
If you are brand new to the overall workflow, Firecloud Printz also has a broader walkthrough on how to use a 3D printer (beginner-friendly).
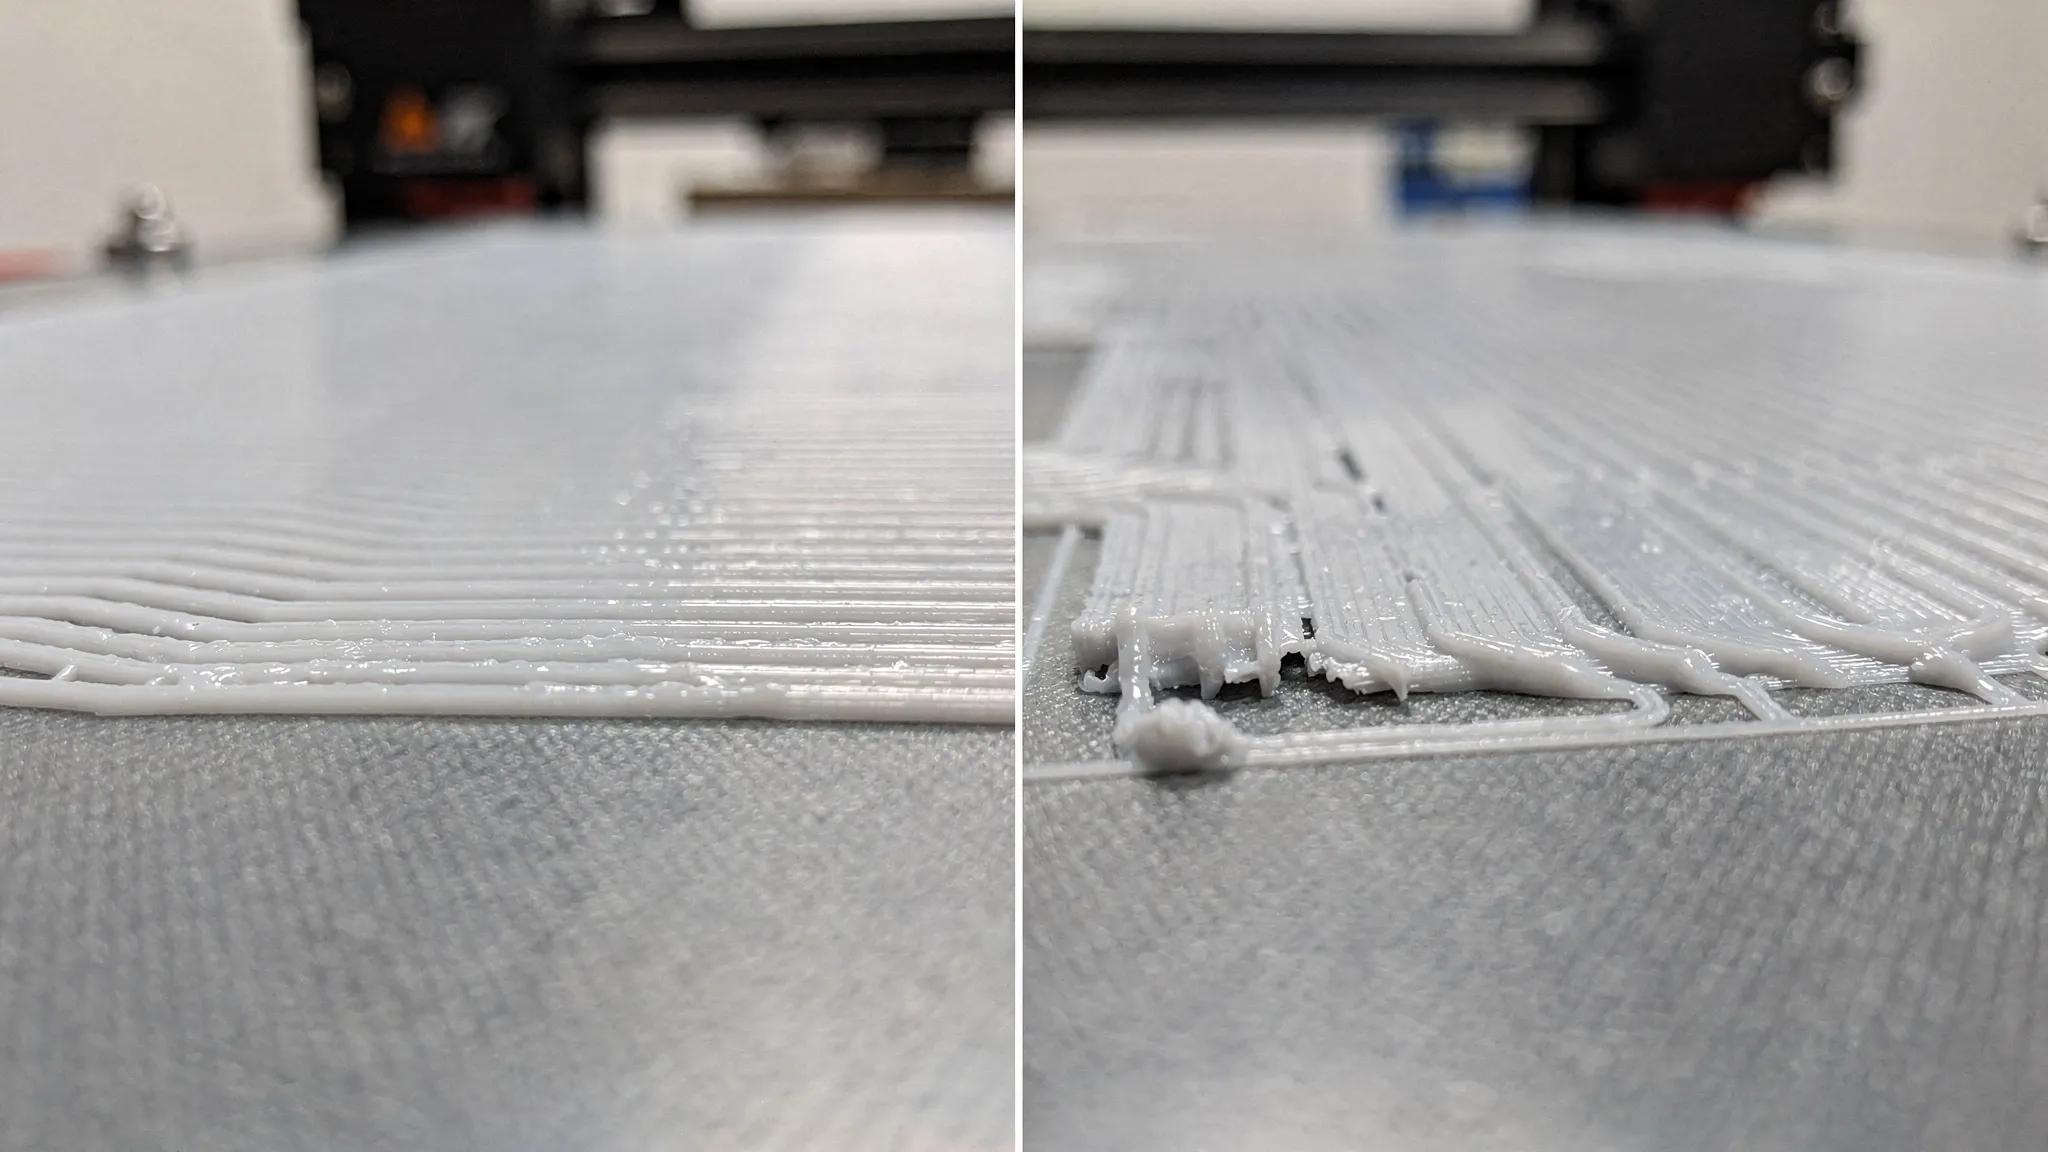
Step 1: Get the first layer right (because it controls everything)
If your first layer is off, the rest of the print is forced to “compensate” with mess: elephant foot, lifted corners, rough undersides, or visible ripples.
FDM: dial in nozzle height and first-layer behavior
A reliable first layer typically has these traits:
- Lines are slightly squished and touch each other (no gaps)
- The surface looks uniform (no thin translucent patches, no ridges)
- Corners do not lift during the first few minutes
Your main controls:
- Z offset / bed leveling: This is the biggest lever. Too high causes poor adhesion and gaps, too low causes ridges and “over-squish.”
- First-layer speed: Slower is usually cleaner. It gives the filament time to stick and reduces drag.
- First-layer temperature: Slightly warmer can improve adhesion, but too hot can cause elephant foot and glossy blobs.
Prusa’s knowledge base has a practical reference on diagnosing first-layer issues and what “good” looks like, including how the lines should merge on the plate.
Resin: focus on adhesion and support foundation
For resin printing, “first layer” is really your base layers plus the first supports. Clean results depend on consistent adhesion and stable supports.
Do these checks before chasing exposure numbers:
- Build plate is properly leveled and tightened
- Resin is mixed (pigments and additives can separate)
- Vat is clean (no cured fragments)
If your printer or resin brand provides validated profiles, start there. Manufacturer profiles often outperform random “community settings,” especially for first-time success.
Step 2: Use slicer settings that prioritize surface finish
You can get clean prints with stock profiles, but a few targeted choices make a big difference without inviting complexity.
FDM slicer choices that usually improve “cleanliness”
Layer height: Lower layer heights reduce visible stair-stepping on curves, but they also increase print time. For a first attempt, choose a “normal” profile (often around 0.2 mm on a 0.4 mm nozzle) for predictable extrusion, then drop layer height later for display parts.
Temperature: Print as cool as you can while still getting consistent layer bonding. Too hot is a common cause of stringing, blobs, and loss of sharp detail.
Cooling: Adequate part cooling improves overhangs and surface finish on many materials (especially PLA). Insufficient cooling can make edges look soft and droopy.
Seam placement: If your slicer lets you control seam location, place it on a back edge or a less-visible corner. A random seam can create a “zipper” line on the most visible face.
Retraction: Retraction helps reduce stringing, but excessive retraction can cause under-extrusion or clogs on some setups. If you see stringing, confirm filament dryness and temperature first, then adjust retraction.
Resin slicer choices that usually improve “cleanliness”
Orientation: Tilt and orient to hide support marks on non-show surfaces. Also avoid large flat areas parallel to the build plate, which can increase suction forces.
Support contact strategy: Smaller contact points reduce scarring but may reduce reliability. For a first print, choose slightly more robust supports, then refine toward cleaner contact points after you have a successful baseline.
If you want a deeper guide to how supports and overhangs impact success, see supports, overhangs, and tolerances.
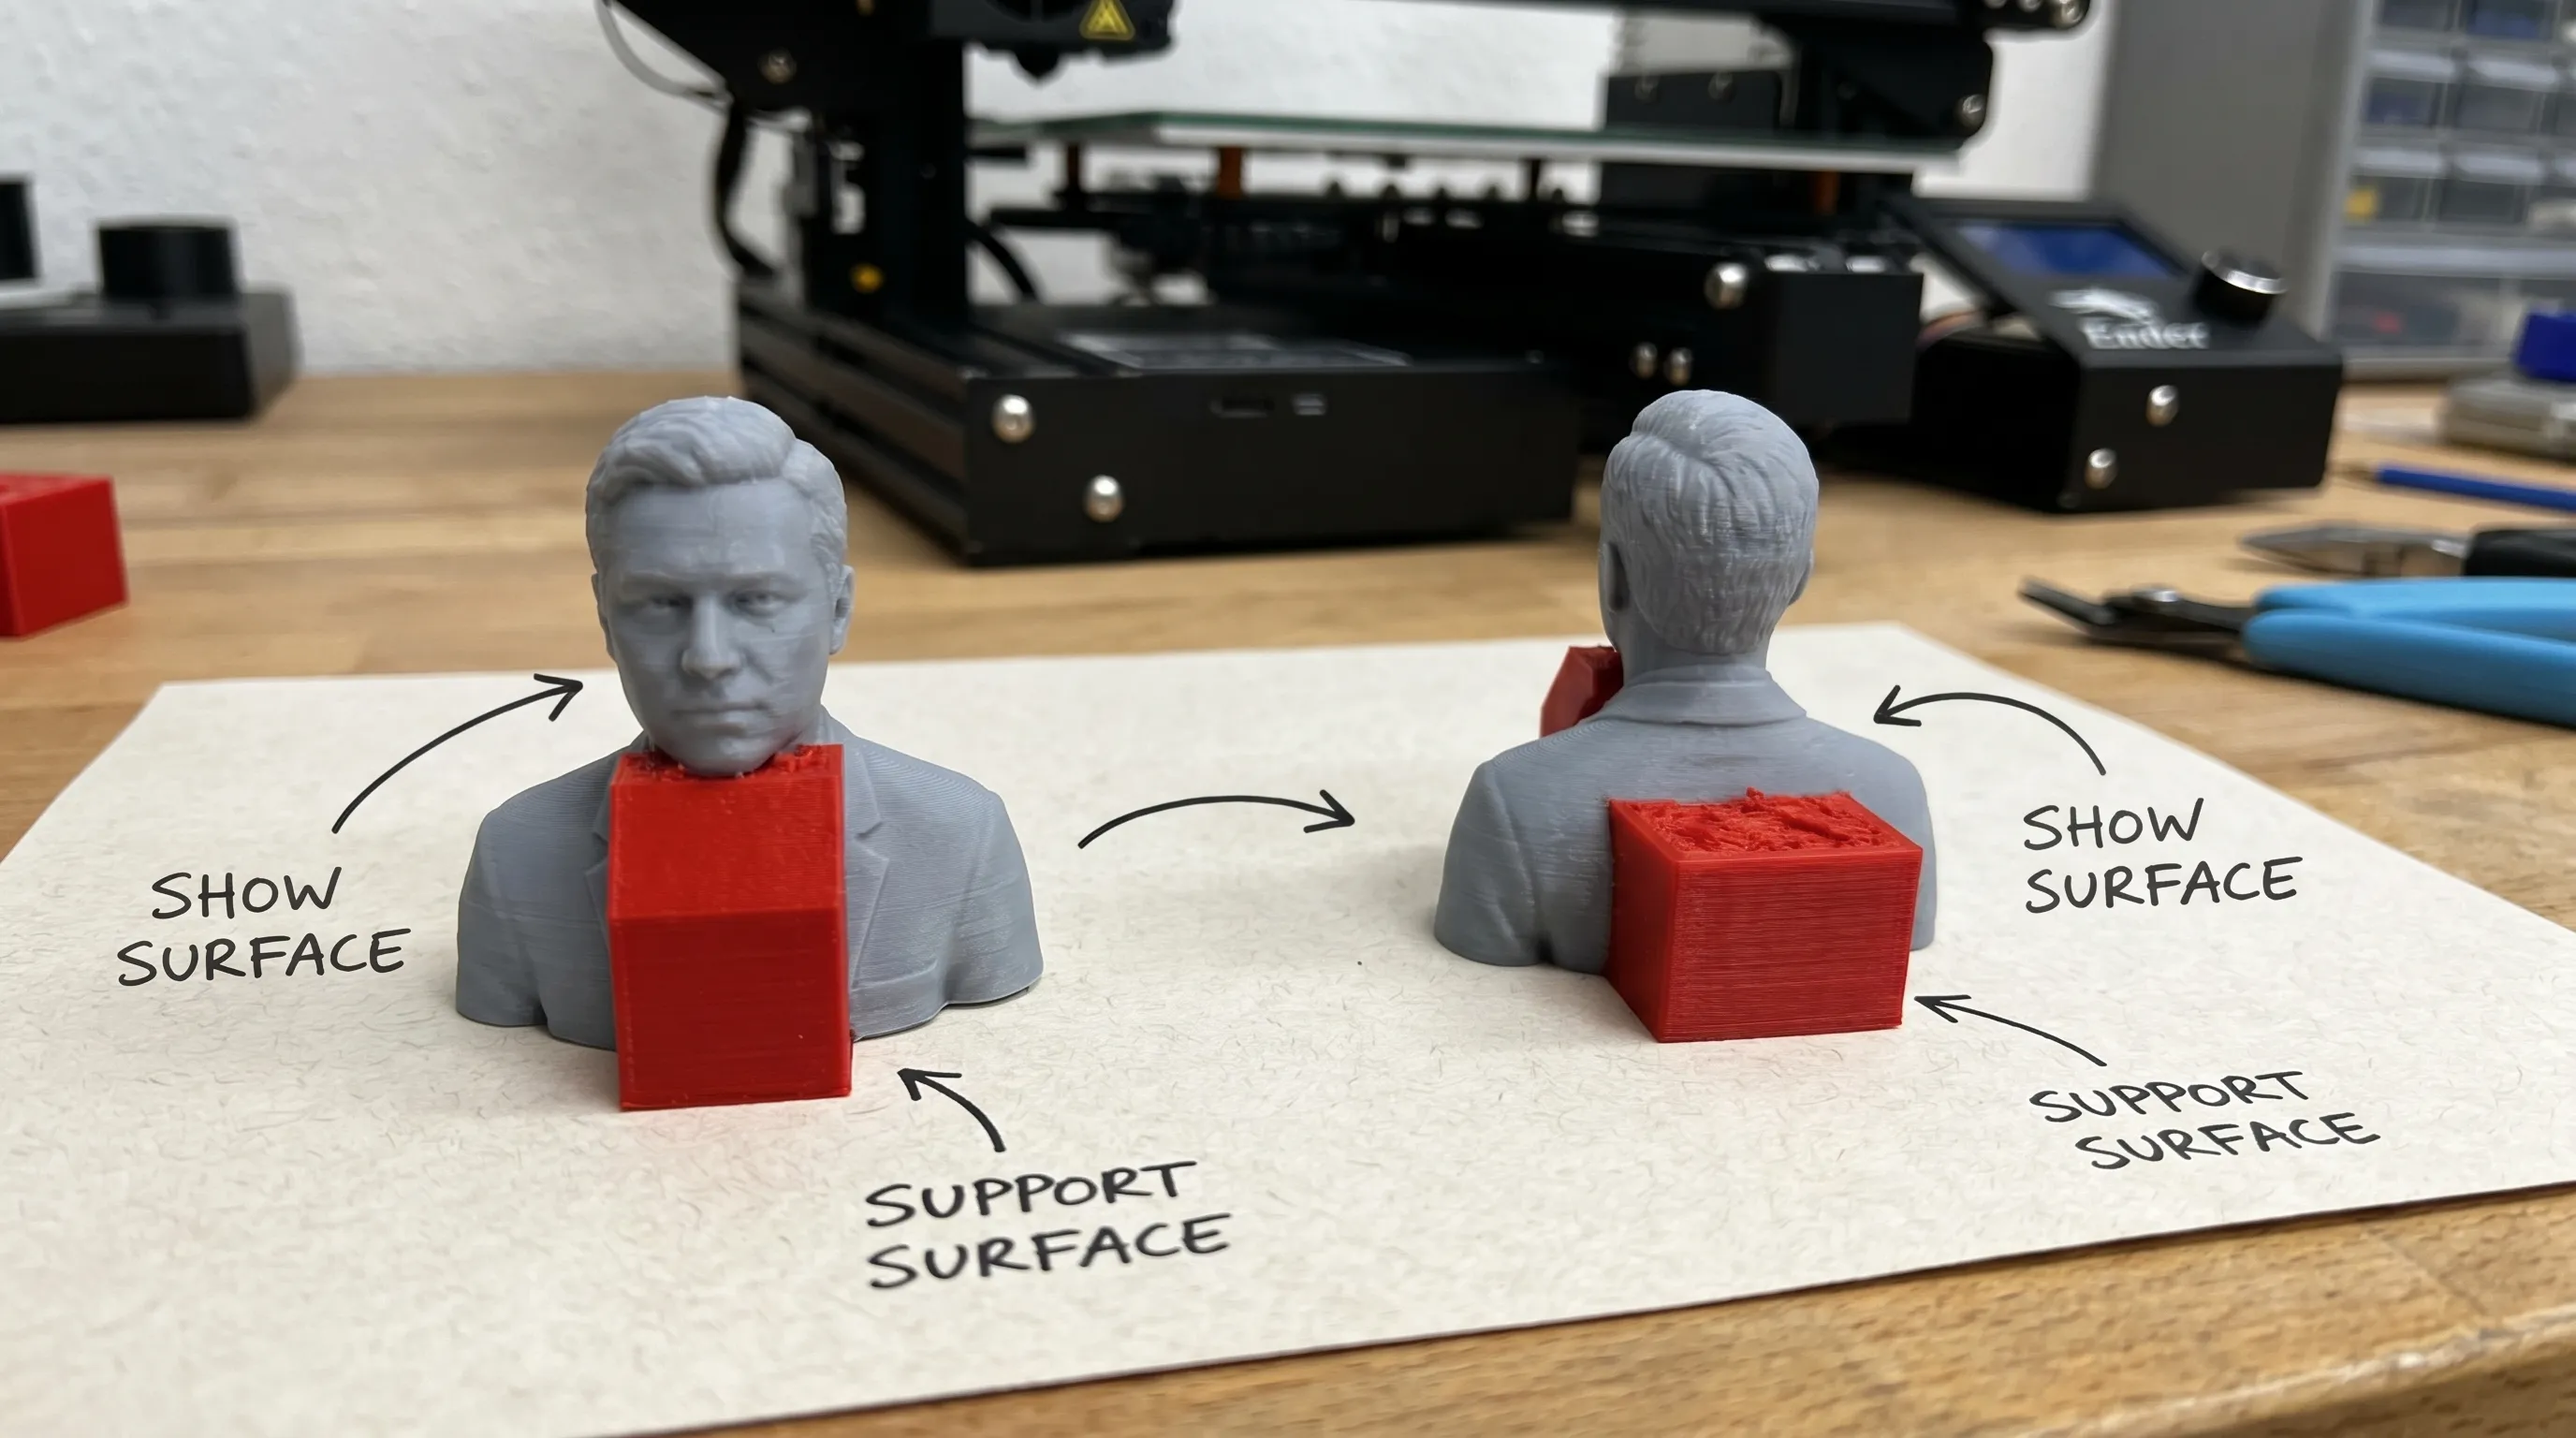
Step 3: Orient for the best-looking surfaces (not just “fits on the bed”)
Orientation is one of the most overlooked “clean print” tools because it is free and it often matters more than tiny setting changes.
For FDM
- Put your most visible face upward or vertical (top and side surfaces often look cleaner than undersides)
- Avoid placing support on your hero surface whenever possible
- Remember: curved surfaces show layer lines more than flat surfaces
For resin
- Hide supports on the back, underside, or interior when possible
- Plan for resin drainage in hollow models
- Keep fine detail away from heavy support clusters
Step 4: Prevent the most common “dirty print” defects (quick diagnosis table)
When people say “my print isn’t clean,” it is usually one or two defects that are easy to spot. Use this table as a fast first pass before you start changing five settings at once.
| Symptom | What it often means | First fix to try |
|---|---|---|
| Stringing (hairy webs) | Filament is wet, temp too hot, retraction not tuned | Dry filament, lower temp slightly, then adjust retraction |
| Blobs or zits | Too hot, inconsistent extrusion, seam behavior | Lower temp a bit, check filament path, set seam to a hidden edge |
| Elephant foot (bulged bottom) | First layer too squished or bed too hot | Raise Z offset slightly, reduce first-layer bed temp, add elephant foot compensation if available |
| Warping (corners lifting) | Poor adhesion, uneven cooling, drafty room | Clean plate, use brim, reduce drafts, consider enclosure for warp-prone materials |
| Ringing/ghosting near corners | Vibration from speed/acceleration | Slow down outer walls, check belt tension, reduce acceleration |
| Support scars (ugly underside) | Support interface too aggressive or on visible areas | Re-orient to move supports, tune support interface, reduce contact density |
If you want an even more complete, plain-English workflow that includes slicing, setup, printing, and post-processing, Firecloud Printz breaks it down in 3D printing process step by step (without the jargon).
Step 5: Make your first test print small and informative
If your goal is “clean on the first try,” you do not need to gamble on a 12-hour print.
A smart approach is to run a 20 to 45 minute test that exposes surface quality issues early:
- A small calibration cube (checks corners, ringing, seam)
- A thin-wall test (checks flow consistency)
- A simple overhang test (checks cooling and support needs)
Once the test looks clean, run the full part with the same profile. The fastest way to waste time is to start with a large model, see defects, then wonder which of ten variables caused them.
Step 6: Set expectations for “clean” based on technology
A big part of first-try satisfaction is choosing the right process for the finish you want.
- FDM is excellent for functional parts and larger models, but layer lines are normal and supports can mark surfaces.
- Resin (SLA/MSLA) can capture fine detail and smoother surfaces, but supports will leave contact marks and parts require washing and curing.
- Powder-based processes (like SLS/MJF) can produce strong parts with no support structures for many geometries, but surface texture is typically more matte and slightly granular.
If you are unsure which process matches your finish goal, Firecloud Printz covers the practical differences in additive printing explained (materials, uses, benefits).
Bonus: If you sell prints or run a small print service, “clean” includes communication
If you are printing for customers (Etsy, local clients, internal teams), clean results also depend on setting expectations: what finish is realistic, where supports will touch, and what tolerances are achievable.
A useful way to level up quickly is structured practice for client conversations, especially around defects, reprints, and timelines. Teams often use AI roleplay training with Scenario IQ to rehearse objection handling and service conversations, which can translate well when you need to explain print tradeoffs clearly and confidently.
When it makes sense to use a professional 3D printing service
Sometimes the “cleanest first try” is letting a dedicated print partner handle machine tuning, material selection, and support strategy.
Consider outsourcing when:
- The part is a gift, client deliverable, or time-sensitive prototype
- You need high detail and consistent finish across multiple pieces
- You do not want to buy extra tools and materials for post-processing
Firecloud Printz specializes in high-quality custom 3D printing and also offers a curated shop of designer-authorized prints. If you have a file ready, you can start at Firecloud Printz and get guidance on the best approach for a clean result.
Frequently Asked Questions
What is the fastest way to get clean prints on my first try? Start with dry material, a clean build surface, and a proven slicer profile. Then run a small test print to confirm first-layer quality before committing to a long job.
Why does my first layer look rough or uneven? The most common causes are incorrect Z offset (too close or too far), a dirty build plate, or printing the first layer too fast. Fix those before changing advanced slicer settings.
How do I reduce stringing on FDM prints? Dry the filament first, then lower nozzle temperature slightly. After that, fine-tune retraction settings. Wet filament and overly hot temperatures are two of the biggest stringing drivers.
How can I avoid ugly support marks? Re-orient the model to move supports to hidden surfaces, and tune support contact/interface settings. For resin, place supports on the back or underside when possible.
What layer height should I use for a clean-looking print? Use a standard “normal quality” profile for your first success, then reduce layer height for display parts where curved surfaces matter. Smaller layer heights usually look cleaner but take longer.
Should I use a 3D printing service instead of printing at home? If you need consistent high-detail results quickly, or the project is important enough that failed attempts are costly, a service can be the most reliable path to a clean finished part.
Get clean, high-detail prints without the trial-and-error
If you want a print that looks great the first time, Firecloud Printz can help you choose the right process and material, then produce a high-detail result with a fast turnaround. Explore the shop for designer-authorized models or request a custom print at FirecloudPrintz.com.